The Best At-Home Exercises
World-wide Pandemic you say? Infection rates not getting better? Hopes and dreams of your gym opening back up in a safe way slowly diminishing?
I hear you. I really do.
So you aren’t in the gym, stuck with only the equipment you have at home, and are pretty sure you are either going to lose all your strength and muscle OR, if you were excited about getting started, thinking you’ll likely need to put a pause on your goals.
STOP RIGHT THERE. That’s absolutely 100% NOT true. I promise you, you can make incredible progress with very minimal equipment at home. You only need to do these 2 things:
Pay rigid attention to your diet, which applies whether you work out at home during a worldwide pandemic or not…and,
Apply some solid techniques during your training sessions to maximize tension and results.
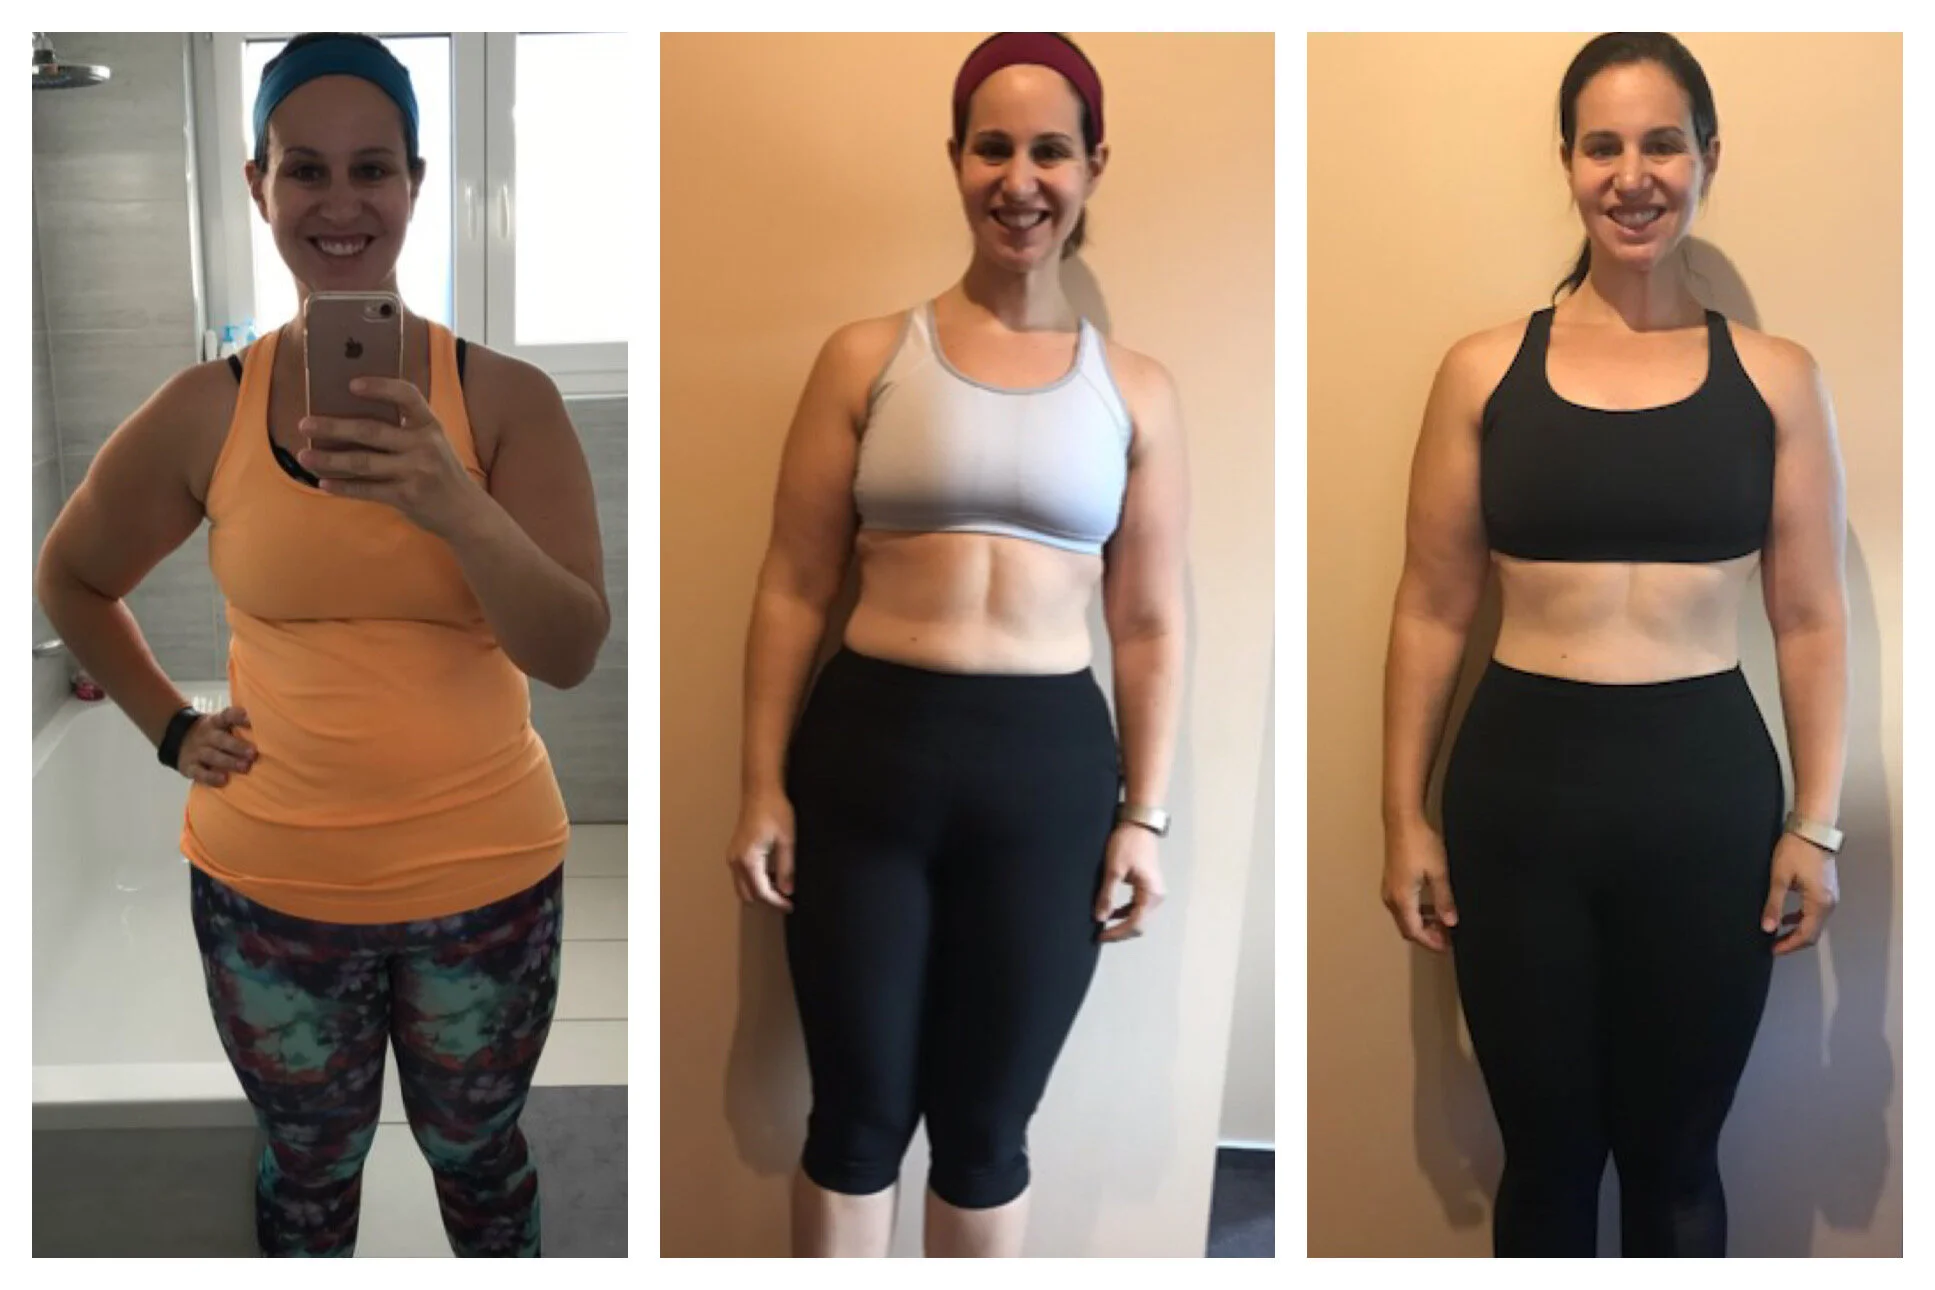
Check out my client Hannah…she’s always trained at home, has only recently upgraded her home gym to include a squat rack, and check out her results:
Also, here’s Jen…Her dumbbell variety is limited but her dedication is fierce. She started with me about halfway through the pandemic stay-home order and in 2 months shes been able to begin the process of completely transforming her body composition:
Research consistently shows that when it comes to hypertrophy (muscle growth), its not the heaviness of the weight that matters but moreso the time under tension and intensity of the training. This means that as long as you are training within 2-3 reps of failure and performing effective repetitions, you will build and/or maintain muscle.
THIS IS GOOD NEWS! It’s better than good…IT’S FREAKING AWESOME. And it officially removes any excuses you’ve made as to why you can’t prioritize your own health and strength.
Aside from that whole homeschooling-and-working-from-home thing…yea I can’t help you there. Just get your workout in BEFORE you crack open your 10am bottle of wine and you should be all good.
Moving on - if you are looking for the best at-home exercises, the truth is that it really depends. It depends on if you have access to dumbbells or not. But many of the best at-home exercises involve your bodyweight.
I’m going to outline a series of tips and techniques you can use with whatever weight you have, even if it’s just your body weight, so that you can feel confident in your ability to gain strength and meet your fitness goals from home, utilizing some of the best at-home exercises.
Here are the 5 steps I will go over in much more detail below:
Step 1: Focus on Your Nutrition
Step 2: Use This Time to Perfect Your Technique
Step 3: Don’t Underestimate the Power of Your Own Bodyweight
Step 4: Use a Challenging (and Reasonable) Rep Scheme
Step 5: Apply Tempo and Advanced Techniques
Let’s go!
Step 1: Focus on your Nutrition
I can never emphasize this enough. Your nutrition is number 1. By “number 1” I mean “the most important thing for any and all health, fitness, strength and wellness goals”. No exaggeration. You can perform the best at-home exercises all day long but if you don’t prioritize your nutrition, your results (aesthetically, mentally, emotionally, physically) won’t be nearly as stellar.
I could write a whole separate article on this alone (which I will - keep your eyes out), but here is a short-list of the best and most efficient ways to tighten up your nutrition - and this applies no matter if your goal is fat loss, muscle gain, or simply feeling better and stronger from the inside out:
Follow the one-plate rule for all meals, as shown in the infograph below, OR follow the Palm Portioning Method outlined in my free eBook for a little more flexibility in your portions:
Plan out your meals ahead of time and aim to eat out only 1 or 2 meals per week.
Make sure that your diet consists of 80-90% whole, nutrient-dense, close-to-the-ground foods. But definitely leave 10-20% wiggle room for “fun” foods. Including these in your diet is good for your mental and emotional well-being! Just keep in mind that 10-20% of an average calorie intake for the day is around 150-350 calories. A couple glasses of wine or a cookie will zap that real quick. So be picky with what you include in your “fun” budget.
***Optional*** For greater accuracy and education into the macro and caloric content of your foods, consider tracking your intake in an app such as My Fitness Pal for 30 days. I recommend setting a custom goal of around 1700-2000 calories (for men, 2300-2600) and ignoring the weight-loss calories MFP sets (they are notoriously low) for now. I also recommend not focusing on weight-loss for a minimum of the first week - the goal here is to get an idea of what you are already eating, without pressure to meet certain numbers. Once you are ready to start trying to hit goals, aim for around 100 grams of protein and 25 grams of fiber a day. If you want to get more specific with your protein and caloric needs, try calculating your calories via the step-by-step macro calculations in my free eBook. You can grab your copy HERE if you don’t already have it. (If you need further help with this, don’t hesitate to e-mail me. I’m always here to help!)
Step 2: Use This Time to Perfect Your Technique
Now is your golden opportunity to slooooow it down and really focus on your form for key movement pattern exercises. Even the best at-home exercises will be worthless with poor technique. Do not underrate this skill - no movement should ever be loaded up with improper form. If you can perfect your form for squats, hinges, pushes and pulls now, then you will be setting yourself up for major strength and muscle gains once you can get back in the gym. Ignore this crucial step, and you will hit a wall super quickly.
How can you make sure your form is on point? Great question - obviously working with a qualified trainer and nutritional coach is your best bet. I assess my own clients’ form via regular video submittals and/or virtual training sessions via Zoom, while also supporting them nutritionally so they can meet their strength and health goals.
If your budget doesn’t allow for a trainer currently, you can find many great tutorials for exercises on YouTube and/or articles breaking down proper form. Click HERE to read an article I wrote on proper form for Romanian Deadlifts. Also, below is a brief push up tutorial from my own YouTube (which I maintain mainly for my client exercise video library):
Another piece of developing solid technique is developing your core. Some of the best at-home exercises for a strong and developed core, from the front to the back, are:
Step 3: Don’t Underestimate the Power of Your Own Bodyweight
Like I said, many of the best at-home exercises are bodyweight-only. Bodyweight training is very undervalued by iron-lovers. One can make some serious strength and muscle gains from bodyweight training, not to mention the skills you can master by focusing on bodyweight training. Some of my favorite skills to focus on with myself and my virtual training clients, in AND outside of the gym, are push ups (and all their variations), chin ups/pull ups, hand stands and pistol squats. I actually view forced at-home training as a blessing in this regard, because I find myself not really focusing on skill development as much when I have access to a full gym.
Skill mastery aside, for women especially, the upper body can be challenged just as much with your own bodyweight as it can with dumbbells and barbells.
Here are some of the best at-home bodyweight exercises you can do for your upper body that will absolutely lead to increased strength and muscle definition when part of an intelligent, periodized program:
For the lower body (think legs and glutes), single-leg squat variations will not only challenge your muscles and strength, but your balance and core stability as well. There are also many exercises you can do to target your quadricep and hamstring muscles. Here are some amazing at-home lower body exercises for strength, muscle and stability:
Step 4: Use a Challenging (and Reasonable) Rep Scheme
Whether you are body weight training or using some dumbbells/weights you have around the house, you’ll need to chose a rep scheme thats challenging with what you have. Forget 3 sets of 10-12 reps…think outside the box.
The goal here is to get to a Rate of Perceived Exertion (RPE) of around 7-8 out of 10. Five pound dumbbell curls for ten reps won’t get you there.
If you are stuck with weights you consider “too light”, try increasing your reps upwards of 15-25. Using that dumbbell curl example, if 10 reps leaves you feeling like you could have kept going, then…keep going. Keep going until getting 2-3 more reps in feels next to impossible - take note of how many reps it took you to get there, but make sure your reps are reasonable. Anything beyond 25 isn’t super reasonable unless you plan to spend the entire day bicep curling to failure. Couple this with decreasing your rest in between sets, or combining exercises in a circuit, will help you feel a higher level of intensity.
Another method you could try is timed sets. This simply means doing as many reps as possible within a certain time frame, most commonly 30 seconds.
Step 5: Tempo and advanced Techniques
Once you have mastered your technique using weight and/or your body within a challenging and reasonable rep scheme, if you still want to level-up, you can apply a variety of techniques to your training to really maximize your training. Even the best at-home exercises can feel fairly easy to a more advanced trainee - that’s where focus on tempo and other techniques comes in! These techniques can be used individually, or in combination with others when it makes sense.
Tempo
Controlling your tempo during strength training refers to controlling the speed at which you move through each phase of a movement. The simplest way to think of this is simply slowing down the exercise, which will inherently increase the time your muscles are under tension, making an exercise feel more challenging.
To get more specific, there are 3 phases to any strength-training exercise. The eccentric phase, the isometric phase, and the concentric phase. The eccentric phase is when the muscle fibers under tension are extending into a lengthened position. You can think of this as the lowering or releasing phase in a movement, like when you are lowering the dumbbell from the curled position into a straight-arm position in a dumbbell curl, or when you are lowering yourself into a squat.
Now when you bring your arm fully up in a bicep curl and pause before releasing, or when you are at the bottom of a squat, that is the isometric phase. “iso” means “same”, and so the muscle fibers in this phase of movement are not lengthening or contracting.
The concentric phase of movement is when the muscle fibers under tension are shortening or contracting. When you bring your hand towards your chest in a dumbbell curl, or when you press your body up in a squat, that’s the concentric phase.
Tempo is usually assigned with a set of 3 numbers representing seconds. The first number refers to the first phase of any given movement (which will be the concentric OR eccentric depending on the exercise). The middle number refers to the isometric phase, and the 3rd number refers to the 3rd phase of movement.
Let’s look at an example:
Goblet Squats, 3x10 @ 3.2.1. tempo. Since all squats begin with the eccentric (lengthening/lowering) phase of the movement, the tempo indicates that you will lower into the squat for a count of 3. You will pause at the bottom for a count of 2, and you will attempt to powerfully press up in 1 second.
Since a bicep curl’s first phase of movement is the concentric (shortening/power) phase, this same tempo applied to a bicep curl would likely be reversed and assigned as 1.2.3. This would mean you would curl up for a count of 1, hold for a count of 2, and lower the dumbbell slow and controlled for a count of 3.
Click HERE to see a brief video demo of these phases.
Isometric Pauses
Pausing at the isometric phase of any movement is a great way to increase intensity and muscle tension and improve form. By pausing for 1-3 seconds, you are removing the ability to use momentum as an assist to the movement. Imagine doing a squat - normally, there is a little bounce at the bottom. By pausing at the point of highest muscle tension, you are removing the bounce and momentum and thus making the movement more intense and higher-quality. Isometric pauses are often written into tempo counts, but these pauses can easily be incorporated without precise focus on the other phases of the movement.
Quarter-Rep Pauses
Similarly to isometric-pauses, quarter-rep pauses remove the assist of momentum and maximize muscle tension and intensity. Instead of pausing at the top or bottom of the movement (the isometric phase), you instead pause half-way down and/or half-way up (during the eccentric and/or concentric phases). So again with the squat example, imagine pausing halfway down and/or halfway up, briefly - maybe 1-2 seconds. Try this with a bodyweight squat - you’ll feel how much more challenging this is right away! Click HERE to see a video demo of how this looks.
1.5 Reps
This one’s fun - it’s exactly as it sounds. Adding a half-rep to each full rep. You do this by pausing at that quarter rep point and then going back into the movement. So in the example of the squat, you would descend down, come up halfway and pause, then descend BACK down, and come all the way up. Click HERE to see a quick video on how this looks.
Super-Setting Same Muscle Groups
Super Setting exercises (performing two exercises back to back, kind of like a mini 2-movement circuit) is a common technique I use in my own client programming all the time. However usually, it is used to pair opposing muscle groups (like a squat and a bicep curl) or complimentary muscles (like biceps and triceps). Super-setting the same muscle groups is a great technique to use if you only have access to lighter weights and you really want to feel your muscles working. Imagine performing a set of squats with an isometric-pause immediately followed by reverse lunges at 1.5 reps. PHEW! Now we’re talking.
Pre/Post Exhaust Sets
This is almost exactly the same as Same-Group Super-Setting as described above, except with a little more suave. In this style of super-setting, your goal is either to pre-exhaust a smaller muscle before taking that muscle into a compound exercise (an exercise involving more than one muscle) OR to exhaust said-smaller muscle after a compound exercise. An example of pre-exhausting a muscle would be doing a set of overhead tricep extensions and then immediately going into a push-up or bench press, which are compound pressing exercises utilizing the chest, shoulders and triceps. Pre-exhausting the triceps in this way will not only increase muscle tension in your triceps, but it will likely make the compound exercise that follows feel more difficult with a lighter weight, being that one of the muscles involved is already exhausted.
Post-Exhaust is exactly the reverse…performing a compound lift utilizing multiple muscles, and then performing an isolation exercise immediately following to exhaust a specific muscle. An example would be performing a set of Romanian Deadlifts (maybe with mid-rep pauses to make them more challenging) immediately followed by dumbbell hip thrust to failure to really exhaust the glutes.
I will often use this technique when I just don’t want to lift heavy. For example, if I want to do Romanian Deadlifts and really feel my glutes and hamstrings working, but want to take it easy on my lower back…I will pre-exhaust either my hamstrings or glutes with an isolation exercise and then perform RDLs at a much lower weight than usual.
Drop Sets (Repping Out)
This technique works extra well when you have weights around your house that have a large difference in weight. Maybe you have a pair of dumbbells that are too heavy, and the next lightest pair are too light. You can use the heavier ones for as many reps as possible, even if it’s only 3-6 reps or so, and then drop them and immediately pump out as many more as you can with the lighter weights. Guaranteed you’ll feel these.
Constant Tension
Whenever you complete one rep of an exercise, you are essentially releasing the tension from the muscle briefly before performing another rep. Applying the Constant Tension technique means that, instead of locking out at the end of a rep, you stop just before lock-out, while there is still tension on the muscle, and then go right into the next reps. Clearly, this method gives the muscle zero rest in a given set and increases tension and intensity! Click HERE to see how it looks.
Don’t know where to start with a training program? I have a few simple resources for you:
Click HERE to download my free 6 week program, which is a full 6 week program you can do from home or in the gym, with a spot to track your weights/reps each week.
Click HERE to view Day 1 of a mostly-bodyweight 3x/week program on my YouTube channel. Days 2 and 3 can also be found my searching across the channel.
Try both of these programs as-written, and then try incorporating some of these techniques on exercises you want to feel more challenged with. For a beginner, they are already very challenging! But if you are a little more advanced with weight lifting and just find yourself struggling with adding tension and intensity, I promise you’ll feel the burn and see the results when following the steps above.
As always, I’m here to help. Don’t ever hesitate to reach out!
Love and Sunshine,
- Jaime


